| Author |
 Topic Topic  |
|
|
Phil Barnes
100 Posts |
 Posted - 01/22/2004 : 10:13:44 PM Posted - 01/22/2004 : 10:13:44 PM

|
Here are some pictures of my new model. So far I have finished the fuselage and tails. The wing is next. I'm still deciding whether to just go with a standard Aegea wing or something special or experimental. The model is very light. With an off-the-shelf Aegea wing it will be about 65oz. The extremeties (nose and tail) are especially light. One thing I may do is try to make a special wing with light tips. Light extremeties make for a responsive plane that indicates lift well. I might also try a different center panel construction that will be easier to build, lighter and may also fail on launch.....decisions,decisions.
Image Insert:
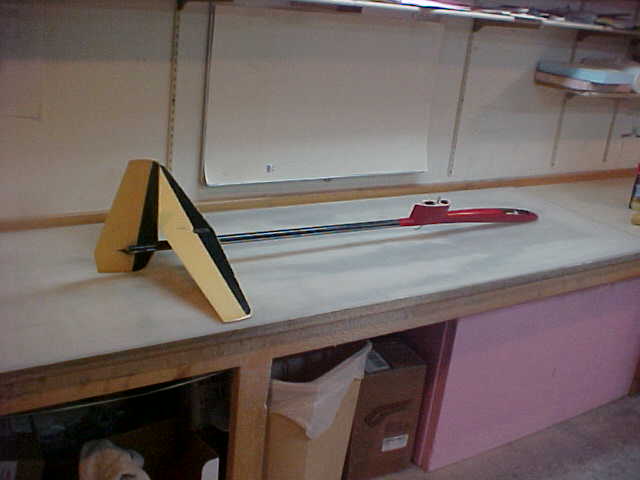
21.92 KB
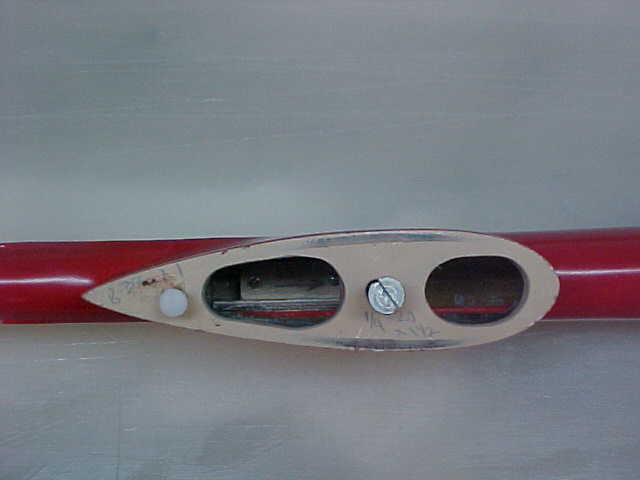
This is a Luchenbach fuselage. The teflon pushrod guide tubes exit the fuselage under the pylon and run outside the boom. The teflon tubes are secured to the boom with some fiberglass strips. Long slots had to be cut in the pylon for the teflon sleeves to exit without a kink. The exit area was then reinforced with three layers of kevlar over the tubes and overlapping onto the pylon. A lot of work and perhaps not recomended.
Image Insert:
25.64 KB
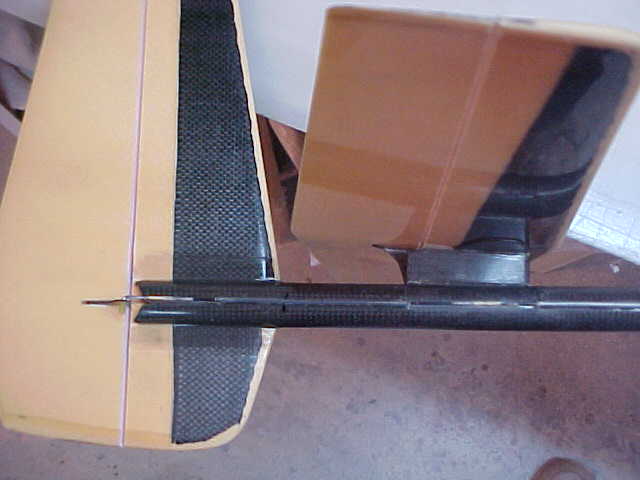
The tails are very light. Vertical fin is just 24g, horizontal stabilizer is 39g, stabilizer pylon and platform assembly about 9g installed. The pushrods are .060 carbon rods. The rudder rod has a splice under the stab mount since I only had 4' rods.
Image Insert:
24.04 KB
The stabilizer bolts on with two 6-32 bolts.
Image Insert:
15.26 KB
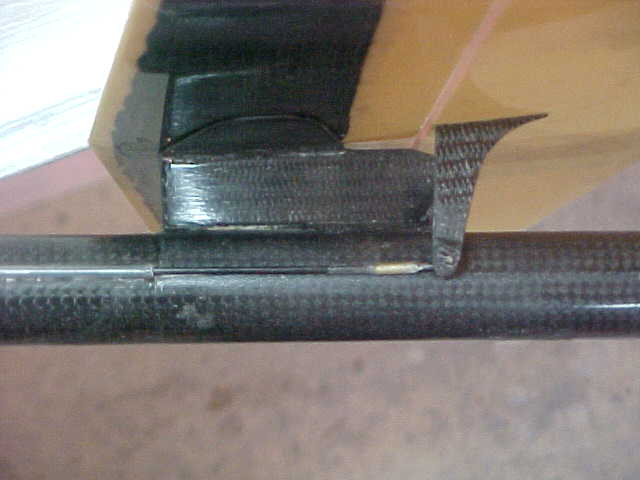
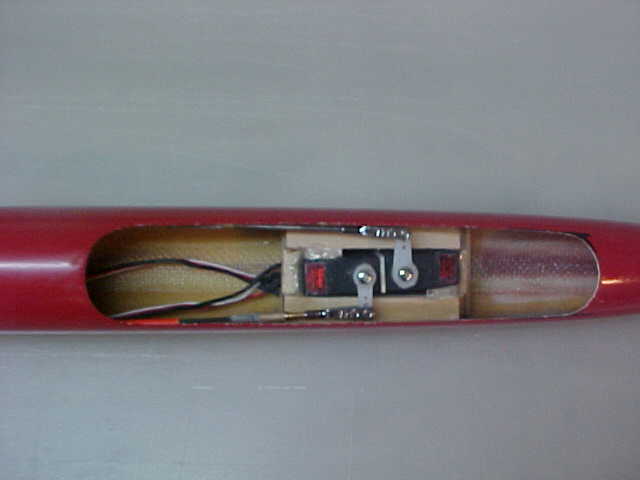
Two HS80mg servos. The teflon guide tube transitions to some stiffer plastic tubing inside the fuselage. The tails are so light that the reciever will have to sit back near or in the pylon and the battery will be behind the servos to get the CG right.
Image Insert:
15.76 KB
The pylon is built inside with the same plywood pieces shown on Terry's plan sheet except I did not add a floor to the ballast area. Also I added a top teardrop shaped piece of plywood that fits just under the pylon lip. It is important that the bolt block be securely epoxied to the other plywood pieces and that all plywood pieces be locked under the pylon's top lip. You don't want the fuse to separate from the wing by the pylon inards pulling out.
I mated the wing underside to the pylon as follows; I mixed up some epoxy and West 410 filler to a peanut butter consistency and put some on top of the pylon. I stuck a piece of wax paper to the bottom of the wing with a little 3M77 and bolted the wing on (wax the bolt and plug up the holes in the top of the pylon with scraps of balsa). This created a perfect mating surface between the wing and pylon. It is important that there not be a gap between the bottom of the wing and the bolt block in the pylon. This will prevent there from being excess tension which would tend to pull the hard point out of the bottom of the wing or the bolt block out of the pylon.
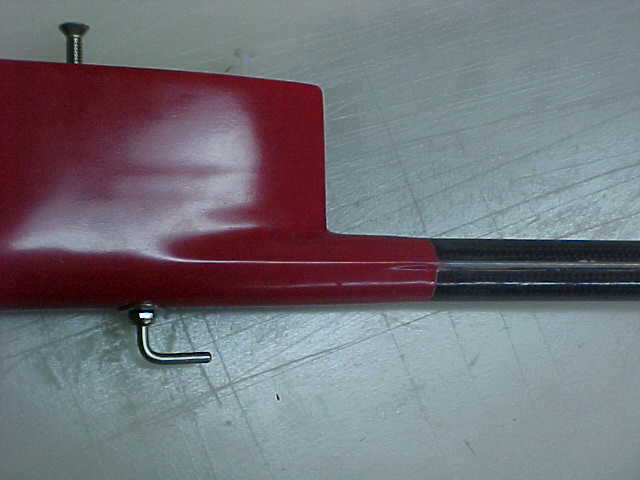
You can see one of the stiffer plastic (red) guide tubes in the pylon. You can also see the adjustable tow hook. Notice also the nylon aft wing mount bolt. This will provide a positive lock for the wing but will still allow the wing to rotate in a bad situation.
The forward end of the tailboom is locked down with a couple scraps of Kevlar that wrap over the end of the tube and up the side of the pylon on the inside. I also wrapped the outside of the pylon where the tailboom exits with two wraps of Kevlar. It is important to securely attach the tailboom so that it cannot break loose from the pylon. You can imagine a strong force pushing down on the aft end of the tailboom (pulling out from the dive for a strong zoom launch). This will try very hard to pop the forward end of the boom upward and break it loose from the pylon. The game is to do everything to keep the tailboom forward end firmly locked down.
Image Insert:
22.82 KB
A good view of the pushrod guide tube exit. Also the adjustable towhook. I hope to replace the towhook with a shorter one as soon as I can find a 10-32 bolt with threads only half way. That's what came with the tow hook I bought but I think it sticks down too far. I can bend a new shorter one once I find the right bolt. |
|
|
Phil Barnes
100 Posts |
Posted - 03/29/2004 : 4:02:51 PM
|
It was 8:00PM Saturday night and I had just finished a batch of wings for NSP. There was a club contest scheduled for the next day and the weather was fairly promising. I had some stock Aegea Mantis wings sitting on the shelf waiting to be sold. My finished Aegea Mantis fuselage and tail assembly was still standing in the corner without a wing. I added up the situation in my head and decided on a course of action; An all nighter to build out one of those stock Aegea mantis wings so I could try out my new model at the club contest the next day! Here is the result:
Image Insert:

53.22 KB
The final flying weight for the model is 64.5 oz. This is really light. To balance the model I had to put the battery pack and reciever inside the fuselage aft of the canopy opening. My initial CG location is 4 1/8" aft of the wing LE. This could change after some more test flying. The model thermalled really nicely and indicated lift well. I am not accusyomed to flying such a light though so I'll either have to get used to it or use some ballast. In my five contest landing attempts on Sunday I never could get the model set up on final properly. The model just does not act like anything I have ever flown before. I think this is just a matter of setting up the correct elevator to flap mix and getting used to what a correct approach looks like with a light model.
I took some pictures of the flap serrvo installation:
Image Insert:

10.95 KB
I built a plywood box out of 1/16" plywood and just tacked it together with CA
Image Insert:

10.8 KB
The servo fits snugly in the box, there is a large cutout for the servo wire to exit. The grommet has been removed from the servo where the wires exit and the servo mounting ears were trimmed off. I used JR DS368 digital servos. You want a large hole for the servo wire so that you can fish it through the wire channel after the box is installed.
Image Insert:

11.42 KB
I wrapped the entire box with 2 oz fiberglass. I lightly sprayed a piece of glass with 3M77 and tacked it to the box. I then trimmed the glass with small curved scissors and wrapped the glass around all sides of the box. Once the glass was all smoothed down, I just saturated the whole thing with thin CA.
Image Insert:

29.35 KB
The servo bay was enlarged to the size of the plywood box and all foam was cleaned out of the hole all the way to the top skin. I added a scrap of balsa sheet to the bottom of the plywood box and sanded that down until the box was the correct thickness to fill the servo hole. I wanted the box to sit in the hole with about a 1/16" recess below the bottom surface of the wing. I will make servo covers later from 1/16" plywood that will sit flush to the bottom of the wing.
Image Insert:

30.77 KB
The box was secured in place with epoxy. I used five minute epoxy since I was in a hurry. A mix of slower epoxy with some sort of filler would be more sensible. Be carefull that epoxy does not get into the wire channel. Be sure that you do not distort the top skin of the wing. This can happen if you have a real thick mix of epoxy and you press real hard to mash the box down in place. Turn the wing over before the epoxy cures to be sure that the top skin is not deformed.
|
 |
|
|
berniew
36 Posts |
Posted - 04/05/2004 : 1:30:28 PM
|
Phil, I am a little surprised you used a piece of balsa on the bottom of your servo box. I am under the impression that you want something stronger with a better surface glue strength like plywood against the top skin to make sure the top skin doesn’t peal from the support.
Bernie |
Edited by - berniew on 04/05/2004 1:31:12 PM |
|
|
|
Phil Barnes
100 Posts |
Posted - 04/05/2004 : 5:40:23 PM
|
I thought about that too. I considered end grain balsa but decided that was not needed. I compromised and used fairly hefty balsa, maybe 10-12lb. The best idea would be to make the ply box deep enough that the balsa would not be needed on the outside of the box. there sould be a tiny space between the box and top skin which would be filled with epoxy or thickened epoxy that would conform nicely to the original top skin curvature. You don't want to mash a flat slab box up against the top skin which should not be perfectly flat. The balsa spacer (something on the order of 1/16"-3/32" thick for a DS368 servo) could be used on the inside of the box. I was confronted with this realization at maybe 3:00AM Saturday night and elected to take the slight chance of putting the balsa outside the box rather than making new ply boxes. I wasn't realy all that concerned or I would have used end grain balsa or plywood or filled the whole space with epoxy.
I actually think that just leaving foam between the ply box and the top skin would be OK as long as the foam and ply box are well bonded together. It seems to me that that would have to be as strong as if there never was a servo hole which all that is realy needed. |
|
|
|
berniew
36 Posts |
Posted - 04/05/2004 : 6:16:20 PM
|
With my Hitec wing servos the boxes are so thin (I copied your box idea) a piece of 1/8 inch light ply on the bottom of the box puts the box almost exactly 1/16" below the bottom skin. Light ply unlike balsa or foam has pretty good surface glue characteristics.
I am going to glue the servos in with goop with a piece of spectra fishing line under the servo which I can then use to cut the servos out if need be. Seems like every time I put a servo in with glue, after the glue dries, I immediately need to pull it out. If I put the servo in with screws it will, of course, never need to come out.
Bernie
|
|
|
|
jon stone
12 Posts |
Posted - 04/05/2004 : 10:31:18 PM
|
Hello Bernie,
I have used GOOP several times to glue servos trays in, but never on anything I wanted out later.
I'm not so sure you're going to be able to "cut" through cured Goop with a string. I suggest you try it on a fully cured sample.
I have heard of dental floss and silicone RTV. That you can cut through with a string. If your box is snug, the RTV will be plenty to hold it in.
And the usual warning of buying the RTV that does not bother electronics. If it smells like vinegar, it's the wrong one.
|
|
|
|
berniew
36 Posts |
Posted - 04/06/2004 : 12:03:56 PM
|
Jon, Thanks for the warning about goop. I do want to be able to get the servos out. I assume RTV stands for some type silicon sealant. Where do you get the type that doesn't smell like vinegar? That is the only type of silicon adhesive/calk/sealant I have seen. Also, if I use it on the servo case why does it matter if the stuff is conductive? As long as I let it cure to the point where it quits gassing before I seal it up is it still a problem?
Bernie |
Edited by - berniew on 04/06/2004 12:09:17 PM |
|
|
|
jon stone
12 Posts |
Posted - 04/06/2004 : 11:25:30 PM
|
Hi Bernie,
Yes RTV means silicone. The RTV is not conductive. When some kinds of RTV cure, they give off acetic acid as a vapor. This is supposed to bother electrical wiring.
Here's a link to more on that topic, if you're interested.
http://www.logwell.com/tech/servtips/RTV.html
The article mentions General Electric Silicone II, which is available at Wal-Mart, or home improvement stores.
Jon
|
|
|
|
Phil Barnes
100 Posts |
Posted - 04/07/2004 : 08:29:35 AM
|
When installing the servos in my Aegea Mantis wing I didn't even have to glue them in at all. The flap servos were inside the plywood boxes. One or two shims of 1/64" plywood wedged them in so tightly that I flew the model all day on Staurday that way. For the aileron servos, I didn't build a plywood box, but I did epoxy plywood strips on two oposing sides of the servo bay. That allowed me to use the same 1/64" plywood wedges to wedge the aileron servos in place.
Before flying the model again I'll probably put a few dabs of five minute epoxy to lock the servos in place. To remove the servos would require only popping the little dabs of epoxy off with a knife, or possibly slipping the knife blade between the servo and the epoxy to break it loose. Five minute epoxy will bond well enough to hold the servos but will come off the servo case cleanly with a little persuasion from a knife.
Phil |
|
|
|
berniew
36 Posts |
Posted - 04/07/2004 : 11:46:03 AM
|
Phil and Jon, thank you. I feel like I am getting hung up on small details but that is what building is. I am going to use 5 min epoxy dabs in my servo boxes as I have it and know how to use it. The boxes are so tight that just keeping the servo from moving toward the control arm part of the box and of course falling out of the box is all that is needed.
I am under no time pressure as the first local TD contest is months away. The boxes are easy to build and install and 5 min epoxy dabs fits my propensity towards KISS. I will build boxes for the aileron servos also and add a little filler to the 5-min epoxy to keep the dabs localized so I can cut them off and pull the servo if needed. As I said earlier, if I make them removable I won’t have to.
Bernie, Local thermal god,landing slob |
|
|
|
jon stone
12 Posts |
Posted - 04/07/2004 : 6:07:10 PM
|
Hi Bernie,
If the boxes are indeed tight, a tape-on cover may be sufficient to keep the servo from moving around. I think I've done that before. 
Since your box fit is tight, I have a suggestion. Make your epoxy blobs on the outside edge of the box, not deep in the well. You can then cut/grind off these bits of epoxy to get the servo out.
Jon
|
|
|
|
berniew
36 Posts |
Posted - 04/08/2004 : 11:20:55 AM
|
Jon, I think the double sided foam tape that comes with the servos will hold them into the box but I know 5 min epoxy blobs at the top of the box will hold them down and probably be easier to remove.
Bernie |
|
|
|
Phil Barnes
100 Posts |
Posted - 04/22/2004 : 3:30:39 PM
|
I flew the new Aegea Mantis again last Sunday at our club's April contest. We had perfect flying weather with no clouds and light winds. I had some time prior to the start of the contest to do some hand launching of the model. My main purpose was to get used to landing the model. I found that I needed to increase my down elevator compensation with flap deployment. That plus a little practice got me to the point where I was able to do landings again pretty much like any other Mantis.
The bigger news was that while hand launching the model, I couldn't help but notice the occasional low level thermals that I was launching into. On numerous occasions I bailed on the landing pattern and attempted to center up in one of those thermals. I was succesful on three separate attempts. The model thermalled out from hand launches on three separate occasions. It has been a long time since I have had a large model (larger than hand launch size) that would climb out from hand launch altitudes. I am very excited about this.
To work the low level lift required careful control inputs. I found it necesary to apply the rudder control separately from the aileron control. I still had the rudder mix turned on but to keep the turns properly coordinated required some extra rudder inputs. If the turns were not kept coordinated then the model would sink too fast and fall out of the low level thermals. The careful control inputs were also required due to the nature of flying a 130" span model within a few wingspans (maybe just a couple wingspans) of the ground. The really exciting news for me is that this model acted like it wanted to climb out and by the end of the day I was feeling very optimistic about working low level lift and making low saves if needed. My previous models (for the last few years) always left me feeling like low saves were not an option. Those models just never wanted to climb out from low level or on small, light lift.
I can't say what the difference is. Maybe there is no difference in performance, maybe just a difference in pilot attitude. The airplane differences are numerous;
1) Larger model - 130" span vs. 120"
2) Different airfoils - Drela foils for wing and tail vs. MH32wing and SD8020 tails.
3) Lighter wing loading - The model was flying last Sunday at about 66oz. This is only slightly heavier than my much smaller previous models.
4) Cross tails vs V tails.
5) Very light extremeties. My previous models had tail mounted servos and a long nose which concentrated weight in the tail and nose rather than near the CG.
One other bit of fun I had with the model on Sunday; After the contest I installed my new Picolario variometer for the first time. I immediately specked the model out to 890 meters. The variometer allowed me to stay centered in a thermal the entire way up. Without the variometer I would not have been able to read the air above a certain height. I was still in lift at 890 meters and I could still see the model but the variometer's voltage reading feature was saying things like "4.5 volts" in reference to my reciever battery pack so I got scared and came back home.
Phil |
|
|
|
Anker
83 Posts |
Posted - 06/01/2004 : 09:35:53 AM
|
I finished my new fuse with the redesigned tails. Foolishly I put the battery just in front of the servos thinking that the CG was "close enough". The plane porpoised badly and I taped more and more lead to the end of the tailboom until it started flying properly. The CG ended up at 50% of chord, which normally would be extremely agressive, but it flies just fine with it this far back. It in unbelievably light. It is going to have its contest debut at Lancaster next weekend.
Anker
Image Insert:
 anker@ankersoft.com/20046193548_temp.jpg" border="0"> anker@ankersoft.com/20046193548_temp.jpg" border="0">
35.04 KB |
|
|
|
leverick
1 Posts |
Posted - 06/02/2004 : 9:13:55 PM
|
Phil, Where can a fella order one of these kits. I've always been a big fan of the mantis and your other works like the xp3 wings. This new design looks great. I especially like the new pod, boom and tail feathers. It looks like a large DLG on from your pictures.
CHEERS,
Leverick
|
|
|
| |
Topic |
|