| Author |
 Topic Topic  |
|
|
Phil Barnes
100 Posts |
 Posted - 01/22/2004 : 11:10:38 PM Posted - 01/22/2004 : 11:10:38 PM

|
I took some pictures as I finished the fuselage of my new Mantis. I will describe a really easy way to get a pretty good finish on a sailplane fuselage. I have used this same sort of method on every sailplane I have ever owned. It works especially well on raw Kevlar fuselages (every model I have owned up until this one).
The first step in the process is to sand the outside of the fuselage. sand out any fiberglass seam lines with 100 grit and sand the entire fiberglass fuselage with 100 grit to remove wax residue and rough it up for better primer/paint adhesion. If the fuselage has Kevlar areas or is all Kevlar then feather out the Kevlar seam lines and any uneven areas with 60 grit sandpaper. Don't worry about raising Kevlar fuzz. That is not a problem. Mix up some epoxy (I use West Sustem 105 resin with 205 hardener for this and all assembly work) with some West Systems 410 filler (you can buy 410 filler from CST). You want a thick enough mix so that it will stay in place where you apply it rather than running. Apply this mixture to any uneven areas or any areas that you want to build up. I also used this to stuff to match the top of the pylon to the underside of the wing as described in the "Phil's new Mantis" post.
Image Insert:
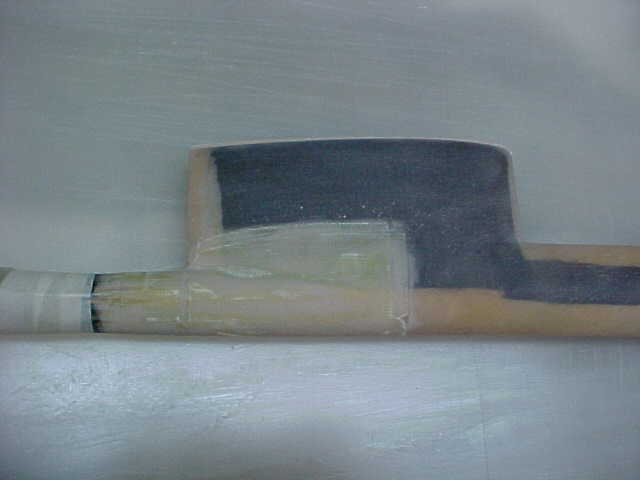
16.01 KB
Here is what it looks like after sanding the 410 filler. You sand almost all of it off. It should only remain in the low areas that need to be filled. I only used this 410 filler for the areas that I had reinforced with Kevlar and where the pushrod guide tubes exited. You may be able to skip this step if you are using an unmodified Luchenbach fuselge.
Image Insert:
14.87 KB
After sanding out the 410 filler, spray the entire fuselage with Duplicolor FP102 "sandable filler primer surfacer" (see end of this post). Spray a lot on. You want the thickness of this product to be as thick or thicker than the deepest imperfection. I sprayed at least half a can on my Luchenbach fuselage. Let this dry overnight.
Image Insert:
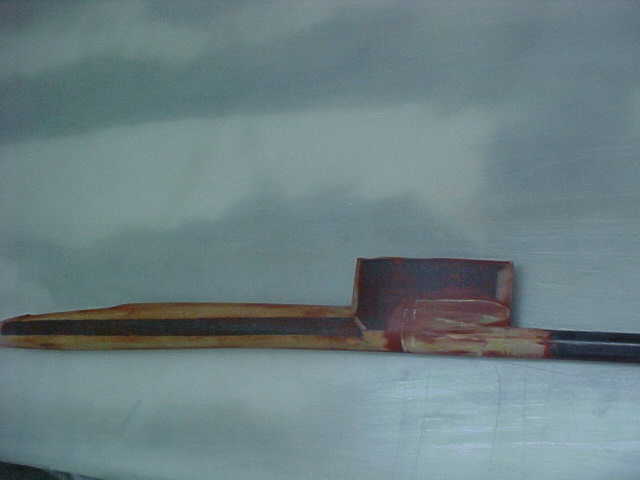
13.86 KB
After the Duplicolor primer/filler dries, wet sand it off until the fuselage looks something like this. I use 220 grit wet-or-dry paper over my shop sink. You must wet sand since the paper will clog otherwise. It is very tedious to sand all the primer off. I spent at least 45 minutes doing it. Just stick with it until the primer is only left in the low areas. There should be no broad areas of primer left. If you are finishing any Kevlar areas there may be some slight areas of raised Kevlar fuzz. That is OK but you should stop sanding any area that has gotten down to the Kevlar already.
Image Insert:
15.53 KB
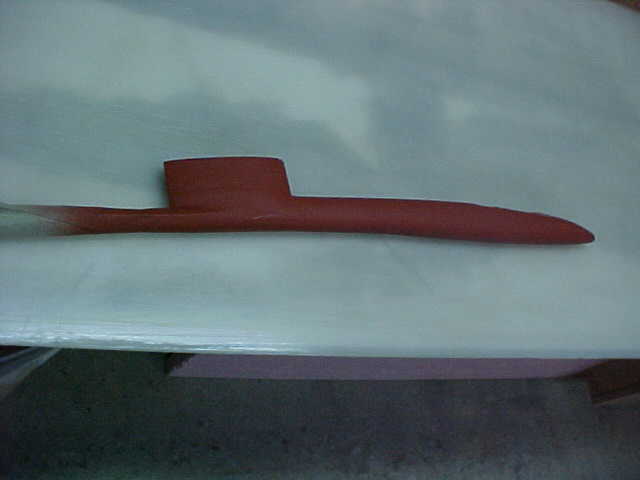
After sanding out the Duplicolor primer/filler, spray on some Krylon primer. Wet sand after it dries. The idea now is leave most of the primer on and only sand areas that are not smooth. I had to spray and wet sand a second coat to cover and smooth out the last of the Kevlar fuzz and bumps under my pylon.
Image Insert:
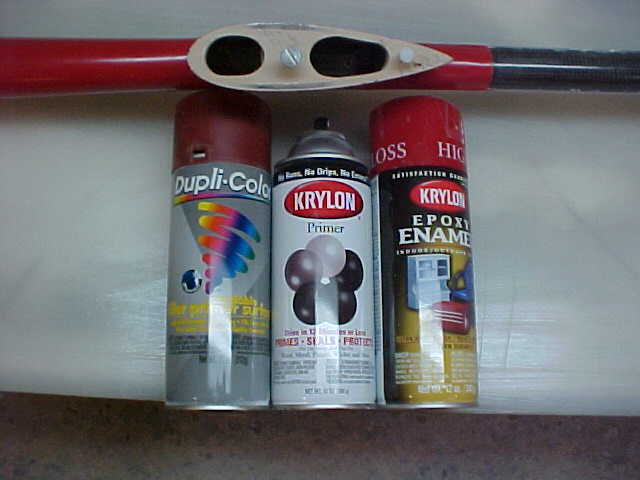
28.12 KB
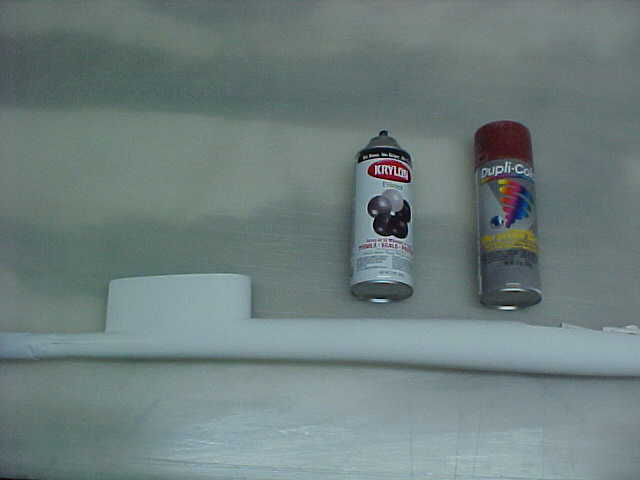
The last step is to spray on some color. Regular Krylon colors are good. This time I tried some Krylon "epoxy enamel". This should make a tougher finish than regular Krylon. Do not sand the finish color. If you use regular Krylon, you can wet sand it and repaint if you don't like how it looks. I'm not sure what would happen if you tried sanding the "epoxy enamel" paint. Maybe it would work, I didn't try it.
The Duplicolor FP102 (slightly different catalog number for other colors) "sandable filler primer surfacer" is sold in automotive departments. I have found it at auto parts stores and at K Mart/ Walmart in the automotive section. Be sure to get the stuff with filler not just regular primer. This is like getting sanding sealer as oposed to clear dope as an analogy.
The Krylon primer (cat. no. 315) should be easy. You can buy Krylon products at home improvement centers, hardware stores, craft stores, K Mart/ Walmart etc.
The Krylon "epoxy enamel" (cat no. 311 for the red)is a little harder to find. I used to see it at Lowes but they stopped carrying Krylon products. Sherwin Williams is the dealer that sells Krylon products so they may be able to at least order some. There is also an "Appliance Epoxy" paint that Krylon sells that would work just as well. You can also use regular Krylon paint which is easy to find, it just won't be as durable.
|
|
|
berniew
36 Posts |
Posted - 01/26/2004 : 4:09:52 PM
|
Phil, thanks for the pictures.  This is pretty much how I finish fiberglass. This is pretty much how I finish fiberglass.
Two question:
1. Do you worry about the unfinished epoxy in the boom? My experience with epoxy is it is susceptible to UV damage. On a boat I made with System III epoxy (comparable to WEST System) I didn’t finish the epoxy on the inside of the cockpit thinking it wouldn’t get that much sun and broke down in one season. And in the NW we don’t get that much sun.
2. Have you tried just using the filler primer instead of using microballoon filled epoxy first? I do this when I am lazy and don’t want to mix and wait for epoxy. It usually takes 3 or so coats of filler/primer but I can do it in one day.
Bernie/soon to be Left Coast Mantis builder |
 |
|
|
Phil Barnes
100 Posts |
Posted - 01/27/2004 : 11:13:37 PM
|
I don't worry about UV damage to carbon with just a clear finish. Never had a problem with it on wings or tail booms. By the way, the clear, shiny finish on the tail boom is just a tiny amount of west systems epoxy smeared on with a finger. If you just smear it on and let it cure it will stay shiny. Use just the tiniest amount, it hardly adds any weight.
I would skip the 410 filler step if there were no discontinuities that were deeper than the primer/filler could cover. A standard Luchenbach fuse without modifications would not need the 410 filler.
The 410 filler is not micro balloons. It is a lightweight filler material that is designed to be sanded and shaped after application and curing. I know it is a hassle to order some from CST but it is the sort of thing that you just love once you've tried it. I've used it on every plane I've built since Frank Weston showed it to me in 1995.
Phil |
|
|
| |
Topic |
|
|
|